
Moodle is a very popular online learning platform and is used by many educational institutions around the world. One of the features provided by Moodle is “Group Choice”. In this article, we’ll cover what Group Choice is and how to use it in Moodle.
Group Choice is a type of Moodle activity that allows lecturers to make group (class) choices for students. In this activity, students can choose the group they want to choose independently. This makes it easier for lecturers to organize different groups in their classes, an example of implementation can be seen in the image below.

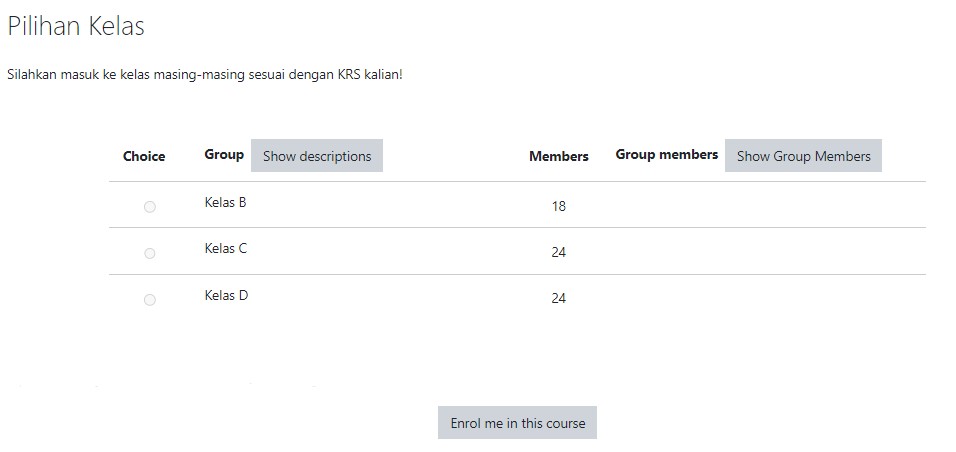
In the example above, there are three types of Group Choice available: “Class B”, “Class C, and “Class D”. Users can select any of the groups they want to join.
By implementing this Group Choice feature, it is hoped that lecturers will not manage multiple courses with the same subject/content/or semester so that they are more efficient at work.
Here are the steps to use Group Choice on Moodle:
1. Create Groups
The lecturer or teacher must first create a group before allowing users to select groups. This step can be skipped if the Group has been prepared beforehand.
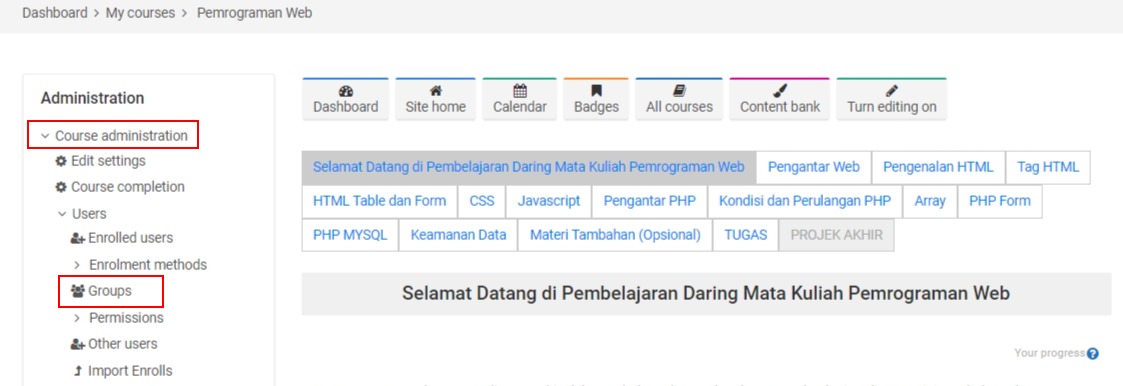
To create a group, lecturers or teachers can have course administration –> User –> Group.

Create a new group as needed, for example, if we are going to create a Class A group, please type the group name in the column group name. Lecturers can add a password to join the group (if needed) in the Enrolment key column. When complete, please click Save.

Follow the same steps if you manage more than 1 class/group.
2. Added Group Choices
After the group list is ready. Then just add activities to be displayed on the course with the following procedure.
1. Don’t forget to activate edit mode(Turn Editing On) on managed courses

2. Then clickAdd Activity or Resource and choose group choice


3. Complete the initial data related to group information in the column group choice name and description. Check the column display description if you want to display a brief description of the activity on the course page.

4. You can determine the number of group members needed and other group settings. Please adjust according to individual needs.

You can also choose whether or not students can see who has joined a particular group. Avoid allowing students to update their choices independently.
5. Select the group selection list that will be displayed to students, you can click on the group name (on the left) and then click the button.


6. Moodle provides activity tracking facilities, if the lecturer wants to use it, he can specify it on “Completion tracking“.

When all the settings are appropriate, please click the button “Save and return to course” to see the result.
After you have finished setting up the Group Choice settings, students can choose the class/group they want to join. Groups will be formed automatically after students choose their groups. Lecturers can also see the groups formed on the activity page.
Hopefully, this article will help you understand the use of Group Choice in Moodle.


